miércoles, diciembre 10, 2014

AsciidoctorJ 1.5.2 released


This week AsciidoctorJ 1.5.2 has been released. It contains several big fixes and also one really important internal change, now the build is done using Gradle and relased using Bintray.

But there is two new features that people waits so much, and it is the integration with asciidoctor-pdf and asciidoctor-epub3. Now you can set backend as pdf in asciidoctorJ. Let's see an easy example:

First of all you need to set asciidoctorj-pdf artifact in your pom in front of asciidoctorJ.

And then you can use AsciidoctorJ as usually.

The execution of previous code will create a sample.pdf file in the same location as sample.adoc.

And for asciidoctorj-epub3 it is almost the same. But with one particularity, you need to create an index file which includes the document to be rendered.

Index file looks like:

And the content itself:

And finally the invocation:

And in this case an epub3 document is generated.

In both cases so easy, add a dependency and you are ready to use them as backends.

We keep learning,
Alex.
Old, but I'm not that old. Young, but I'm not that bold. And I don't think the world is sold. I'm just doing what we're told. (Counring stars - OneRepublic)

Arquillian + Java 8


With Java 8, a lot of new language improvements have been implemented for making life of developer easier. In my opinion, one of the greatest things it has Java 8 is that in some situations developed code looks more beautiful that using prior approaches, and I am referring in Lambdas and Method references. This post is not about learning these Java 8 features but how to apply them in Arquillian framework.

I have detected four use cases where method references and lambdas can be used in Arquillian. Here you can see them, and of course if you found any other one, feel free to share with us.

Merge libs inside a JavaArchive

To write tests with Arquillian you need to create the deployment file programmatically (jar, war or ear). This is accomplished using Shrinkwrap. Your deployment file sometimes will require you add some external dependencies on it. Typical example is when you are creating a WebArchive and you need to add some dependencies to WEB-INF/lib. In this case it is easy because there WebArchive class has a method called addAsLibraries which basically adds the given jars in the libraries path.

But what's happening when your deployment file is a jar file? Then you need to merge each library inside JavaArchive object by using merge method.

This is a way to do it but with Java 8, you can use foreach function and method references.

Note that we are converting the Array into a stream so we can call foreach function. In version 2.2.0 of ShrinkWrap Resolver you will be able to get dependencies as List, so you will be able to get an stream without any conversion. Next important point is that we are using method reference feature to merge all dependencies. Now with a single line we can merge all dependencies.

 Creating custom Assets

Arquillian uses ShrinkWrap to create the deployment file and add resources inside. These resources are added by using any of the methods provided by the API like add, addClass, addAsManifestReource and so on. These methods can receive as first parameter an Asset. Asset is an interface which contains only one method called openStream which returns an InputStream. Assets are used for setting the content of file that will be be added inside the deployment file. 

For example:

ShrinkWrap comes with some already defined assets like Url, String, Byte, Class, ... but sometimes you may need to implement your own Asset.

In this case we are using an inner-class, but because Asset class can be considered a functional interface (only one abstract method), we can use Lambdas to avoid the inner class.

So much simple and more readable.

Parsing HTML tables

If you are using Arquillian Drone or Arquillian Graphene, you will be use some WebDriver Selenium classes for getting web page elements. Sometimes you need to validate columns of and HTML table, and in this cases you can end up by having a lot of boilerplate code iterating over columns and rows to validate that contains the correct values.


Your code prior to Java 8 will look something like:

But in Java 8, with the addition of streaming API, the code becomes much easier and readable:


As you can see code is pretty much compact. What we are doing here is first of all getting all web elements of column title, no news here. But then streaming API comes to play. First we create an stream from a list by calling stream method. Then what we are doing is calling the method getText from all WebElements present in the list. And finally the list of strings which in fact is a list of content of all rows of column title is returned. 

See that in this case the code is much readable than previous one, and more important is that you can even create a parallel stream to get all power of multi-core processors.

So as you can see Java 8 can be used not only in business code but also in tests.

We keep learning,
Alex.
See yourself, You are the steps you take, You and you, and that's the only way (Owner Of A Lonely Heart - Yes)

Music: https://www.youtube.com/watch?v=lsx3nGoKIN8

martes, diciembre 09, 2014

RESTful Java Patterns and Best Practices Book Review


Past week I have been reading the book RESTful Java Patterns and Best Practices written by Bhakti Mehta. It is a good introduction book of RESTful patterns which compares how common REST API problems like pagination or internationalization are solved by companies like GitHub, Facebook or Twitter. Also there is one introductory chapter to HATEOAS.

The book is well-written and faces clearly each problem and how can be solved. Also compares how the same problem has been implemented by different companies, comparing their approaches and what are the advantages and disadvantages of each one.

Maybe as something to be improved for my taste is the examples. In my opinion (maybe because of my expectations), the code examples are simple, which on one side is good because they are easy to follow but on the other side you will need to search on internet to find more complex examples on how to implement what is described in the book. Of course this will depend on your knowledge of REST and JAX-RS.

Overall a good book to read, easy understanding and a good starting point for RESTful patterns.

domingo, noviembre 30, 2014

Arquillian Cube. Let's zap ALL these bugs, even the infrastructure ones.


Docker is becoming the de-facto project for deploying applications inside lightweight software containers in isolation. Because they are really lightweight they are perfect not only to use in production, but to be used inside developer/qa/CI machine. So the natural step is start writing tests of your software that runs against these containers.

In fact if you are running Docker on production, you can start writing infrastructure tests and run them as a process of your release chain (even debugging in developer machine) before touching production.

That's pretty cool but you need a way to automate all these steps from the point of view of developer. It should be amazing if we could startup Docker containers, deploy there the project and execute the tests from a JUnit and as easy as a simple JUnit. And this is what Arquillian Cube does.

Arquillian Cube is an Arquillian extension that can be used to manager Docker containers from Arquillian.

Extension is named Cube for two reasons:
  • Because Docker is like a cube
  • Because Borg starship is named cube and well because we are moving tests close to production we can say that "any resistance is futile, bugs will be assimilated".

With this extension you can start a Docker container with a server installed, deploy the required deployable file within it and execute Arquillian tests.

The key point here is that if Docker is used as deployable platform in production, your tests are executed in a the same container as it will be in production, so your tests are even more real than before.

But also let you start a container with every required service like database, mail server, … and instead of stubbing or using fake objects your tests can use real servers.

Let's see a really simple example which shows you how powerful and easy to use Arquillian Cube is. Keep in mind that this extension can be used along with other Arquillian extensions like Arquillian Drone/Graphene to run functional tests.

Arquillian Cube relies on docker-java API.

To use Arquillian Cube you need a Docker daemon running on a computer (it can be local or not), but probably it will be at local.

By default Docker server is using UNIX sockets for communication with the Docker client, however docker-java client uses TCP/IP to connect to the Docker server, so you will need to make sure that your Docker server is listening on TCP port. To allow Docker server to use TCP add the following line to /etc/default/docker:

DOCKER_OPTS="-H tcp://127.0.0.1:2375 -H unix:///var/run/docker.sock"

After restarting the Docker daemon you need to make sure that Docker is up and listening on TCP.

$ docker -H tcp://127.0.0.1:2375 version

Client version: 0.8.0
Go version (client): go1.2
Git commit (client): cc3a8c8
Server version: 1.2.0
Git commit (server): fa7b24f
Go version (server): go1.3.1

If you cannot see the client and server versions then means that something is wrong in Docker installation.

After having a Docker server installed we can start using Arquillian Cube.

In this case we are going to use a Docker image with an Apache Tomcat and we are going to test a Servlet.

And the test:


Notice that the test looks like any other Arquillian test.

Next step is add Arquillian dependencies as described in http://arquillian.org/guides/getting_started and add arquillian-cube-docker dependency:


Because we are using Tomcat and because it is being executed in a remote host (in fact this is true because Tomcat is running inside Docker which is external to Arquillian), we need to add Tomcat remote adapter.

And finally arquillian.xml is configured:

(1) Arquillian Cube extension is registered.
(2) Docker server version is required.
(3) Docker server URI is required. In case you are using a remote Docker host or Boot2Docker here you need to set the remote host ip, but in this case Docker server is on same machine.
(4) A Docker container contains a lot of parameters that can be configured. To avoid having to create one XML property for each one, a YAML content can be embedded directly as property.
(5) Configuration of Tomcat remote adapter. Cube will start the Docker container when it is ran in the same context as an Arquillian container with the same name.
(6) Host can be localhost because there is a port forwarding between container and Docker server.
(7) Port is exposed as well.
(8) User and password are required to deploy the war file to remote Tomcat.

And that’s all. Now you can run your test and you will see how tutum/tomcat:7.0 image is downloaded and started. Then test is executed and finally the docker container is stopped.

This has been a simple example, but you can do a lot of more things like creating images from Dockerfile, orchestrate several docker images or enrich the test to programmatically manipulate containers.

For more information you can read https://github.com/arquillian/arquillian-cube and of course any feedback will be more than welcomed.

We keep learning,
Alex.
Come on now, who do you, Who do you, who do you, who do you think you are?, Ha ha ha, bless your soul, You really think you're in control? (Crazy - Gnarls Barkley)
Music: https://www.youtube.com/watch?v=bd2B6SjMh_w 

martes, septiembre 23, 2014

Java EE + MongoDb with Apache TomEE and Jongo Starter Project


Know MongoDB and Java EE, but you don't know exactly how to integrate both of them? Do you read a lot about the topic but you have not found a solution which fits this purpose? This starter project is for you:

You will learn how to use MongoDB and Java EE in a fashion way without having to depend on Spring Data MongoDB framework but with "similar" basic features.

The only thing better than a Maven archetype is a repository you can fork with everything already setup. Skip the documentation and just fork-and-code. This starter project contains:
The example is pretty simple, we want to store colors inside a MongoDB collection.

Our POJO is like:


Note that we are using @ObjectId annotation provided by Jongo to set this field as MongoDB id. Moreover because it is called _id, the id will be set automatically.

Then the service layer:


Note that there isn't a lot of code, but some points are really interesting stuff. Let's analyze them.

@Singleton is used to define an EJB as singleton, it works with @Stateless as well, for Java EE users no news here.

The class is abstract. Why? Because it allows us to not implement all methods but define them.

Also implements java.lang.reflect.InvocationHandler. This is because we want to use one really interesting feature which allows us to create a fallback method called invoke. For any method defined but not implemented this method is called.

We have a MongoCollection class (from Jongo project) that it is injected. MongoCollection represents a collection in MongoDB. Because we need to set which collection we want to work with, an annotation called @JongoCollection is created so you can pass the name of the backend collection. Note that MongoCollection is produced by CDI container by using our custom producer. Again no news here for CDI users.


Then there is a lot of methods which represents CRUD operations. Note that they are not implemented, they are only annotated with @Insert, @Find, @Remove, ... to set which is the purpose of the method we want to execute. Some of them like finders or removers can receive Jongo-like query to be executed. And also a method called countColors which as you can see you can implement as custom method without relying to logic implemented within invoke method.

And finally the invoke method. This method will be called for all abstract methods, and simply sends to PersistenceHandler class, which in fact is a util class against Jongo to execute the required operation.

And that's all, quite simple, and if you want to add new abstract operations, you only need to implement them inside PersistenceHandler class.

Some of you may wonder why I use annotations and not the typical Spring Data approach where the name of the method indicates the operation. You can implement this approach as well, it is a simple matter of creating a regular expression inside PersistenceHandler class instead of if/else with annotations, but I prefer annotations approach. Faster in execution time, clean, and for example you can refactor the annotation name from @Find to @Buscar (Spanish equivalent) without worrying if you are breaking some regular expression.

And finally the test:


This is an Arquillian test that has nothing special apart from one line:

.addAsManifestResource(new StringAsset(MONGODB_RESOURCE), "resources.xml")

Because we are using Apache TomEE we use the way it has to configure elements to be used as javax.annotation.Resource in our code.

The META-INF/resources.xml content will be:


and then we use in our MongoClient producer to create the MongoClient instance to be used inside code. Note that we are using @Resource as any standard resource like DataSource, but in fact MongoClientURI is injected:


so in fact Mongo connection is configured in META-INF/resources.xml file and thanks of TomEE we can refer it as any standard resource.

If you are going to use other application server you can change this approach to the one provided by it, or if you want you can use DeltaSpike extensions or your own method. Also because MongoClient database is get from a method annotated with @Produces  you can be injected it wherever you want on your code, so you can skip the abstract services layer if you want.

What are the benefits of this approach?

First that it is Java EE solution, you can use it without depending on Spring framework or any other library. You implement what you need, you do not download a bunch of libraries simply for accessing a MongoDB with some kind of object mapping.

Also as you may see, the code is quite simple and there is no magic behind it, you can debug it without any problem, or even improve or change depending on your needs. The code is yours and is waiting to be modified. Do you want to use native MongoDB objects instead of Jongo? No problem, you can implement it. Moreover there aren't much layers, in fact only one (the PersistenceHandler) so the solution is pretty fast in terms of execution.

Of course this do not mean that you can't use Spring Data MongoDB. It is a really interesting framework, so if you are already using Spring, go ahead with it, but if you plan to use a full Java EE solution, then clone this project and start using MongoDB without having to make some research on the net about how to integrate both of them.

You can clone the project from https://github.com/lordofthejars/tomee-mongodb-starter-project

We keep learning,
Alex.
I'm driving down to the barrio, Going 15 miles an hour cause I'm already stoned, Give the guy a twenty and wait in the car, He tosses me a baggie then he runs real far (Mota - The Offspring)

Music: https://www.youtube.com/watch?v=xS5_TO8lyF8

jueves, septiembre 18, 2014

Apache TomEE + Shrinkwrap == JavaEE Boot. (Not yet Spring Boot killer but on the way)


WARNING: I am not an expert of Spring Boot. There are a lot of things that I find really interesting about it and of course that can really improve your day-to-day work. Moreover I don't have anything against Spring Boot nor people who develop it or use it. But I think that community are overestimating/overvenerating this product.

A year ago I started to receive a lot links about blogposts, tweets, information about Spring Boot. From his website you can read:

Spring Boot makes it easy to create stand-alone, production-grade Spring based Applications that can you can "just run". 

And it seems that this thing has just revolutionized the Java world.

For example a Spring MVC (RESTful as well) application in Spring Boot looks like:

As you can see the magic happens inside SpringApplication class which starts an embedded Tomcat or Jetty and using Spring thing it registers this controller. Pretty impressive I know with a few lines you can have an endpoint ready to be used.

But I wonder to myself if it is possible to use the same approach in JavaEE world and with the same low-level and light requirements. And the answer is absolutely. I have just created a really small protoype/proof-of-concept to prove that it is possible.

Also please don't misunderstand me, Spring boot offers a lot of more things apart from self-contained application like monitoring, actuators, or artifact dependency resolution. But these things are only integration with other technologies, my example has been developed from zero in 1 hour and a half so don't expect to have a Spring boot ready to be used.

The first thing to choose is the application server to be used, and in this case there is no doubt that the best one for this task is Apache TomEE. It is a certified web profile Java EE server which takes 1 second to start up and works with default Java memory parameters.

So I added tomee dependencies in my pom.xml file.


In used tomee embedded version (1.7.1) you can only deploy applications contained inside a file, you cannot add for example a Servlet programmatically like it is done in Tomcat. This may change in near future of embedded tomee API, but for now we are going to use ShrinkWrap to create these deployment files in a programmatic way.

This is what we want to do:

Notice that we are only importing JavaEE classes and it is as reduced as Spring Boot one. In only 2 seconds the application is ready to be used. Keep in mind that you can use any feature provided by web profile spec as well as JAX-RS or JMS. So for example you can use JPA, Bean Validation, EJBs, CDI, ...

And what's inside TomEEApplication? You will be surprised a class with only 70 lines:


As you may see it is really simple piece of code and for example configuration or name of the application is hardcoded, but see that with several small easy changes you may start configuring server, application and so on.

In summary, of course Spring Boot is cool, but with really simple steps you can start having the same in JavaEE world. We (Apache TomEE contributors) are going to start to work on this and expand this idea. 

So don't underestimate Java EE because of Spring Boot.

We keep learning,
Alex.
Do you believe in life after love, I can feel something inside me say, I really don't think you're strong enough, Now (Believe - Cher)

jueves, septiembre 11, 2014

Defend your Application with Hystrix


In previous post http://www.lordofthejars.com/2014/07/rxjava-java8-java-ee-7-arquillian-bliss.html we talked about microservices and how to orchestrate them using Reactive Extensions using (RxJava). But what's happen when one or many services fail because they have been halted or they throw an exception? In a distributed system like microservices architecture it is normal that a remote service may fail so communication between them should be fault tolerant and manage the latency in network calls properly.

And this is exactly what Hystrix does. Hystrix is a latency and fault tolerance library designed to isolate points of access to remote systems, services and 3rd party libraries, stop cascading failure and enable resilience in complex distributed systems where failure is inevitable.

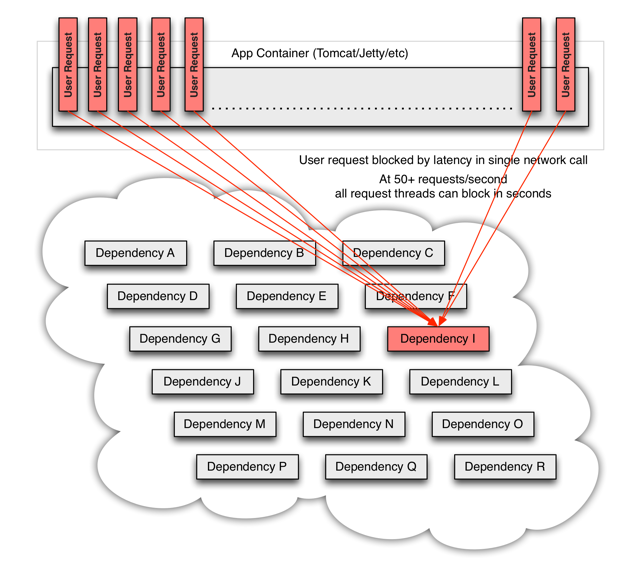
In a distributed architecture like microservices, one service may require to use other services as dependencies to accomplish his work. Every point in an application that reaches out over the network or into a client library that can potentially result in network requests is a source of failure. Worse than failures, these applications can also result in increased latencies between services. And this leaves us to another big problem, suppose you are developing a service on a Tomcat which will open two connections to two services, if one of this service takes more time than expected to send back a response, you will be spending one thread of Tomcat pool (the one of current request) doing nothing rather than waiting an answer. If you don't have a high traffic site this may be acceptable, but if you have a considerable amount of traffic all resources may become saturated and and block the whole server.

An schema from this scenario is provided on Hystrix wiki:


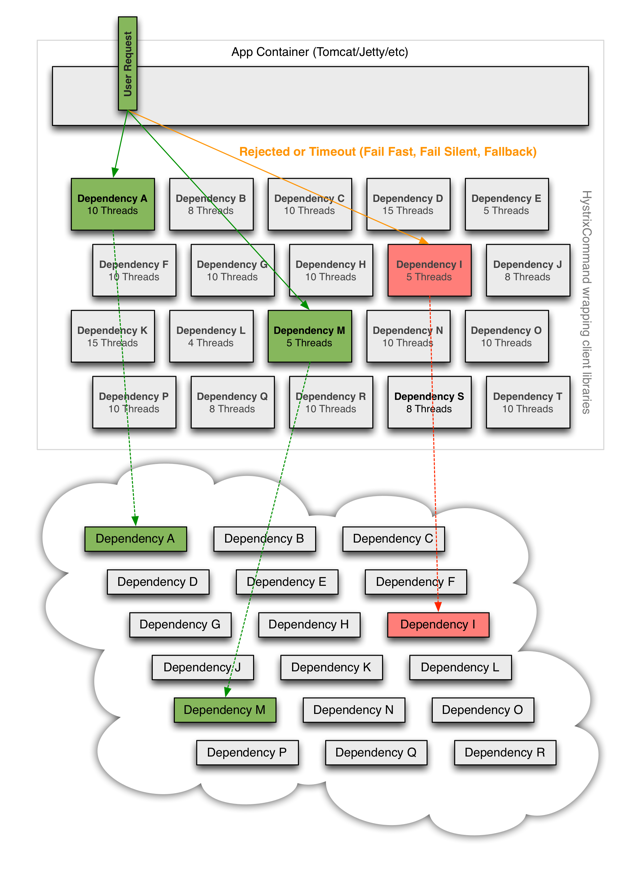
The way to avoid previous problem is to add a thread layer which isolates each dependency from each other. So each dependency (service) may contain a thread pool to execute that service. In Hystrix this layer is implemented by HystricxCommand object, so each call to an external service is wrapped to be executed within a different thread.

An schema of this scenario is provided on Hystrix wiki:


But also Hystrix provides other features:
  • Each thread has a timeout so a call may not be infinity waiting for a response.
  • Perform fallbacks wherever feasible to protect users from failure.
  • Measure success, failures (exceptions thrown by client), timeouts, and thread rejections and allows monitorizations.
  • Implements a circuit-breaker pattern which automatically or manually to stop all requests to an external service for a period of time if error percentage passes a threshold.
So let's start with a very simple example:


And then we can execute that command in a synchronous way by using execute method.

new HelloWorldCommand().execute();

Although this command is synchronous, it is executed in a different thread. By default Hystrix creates a thread pool for each command defined inside the same HystrixCommandGroupKey. In our example Hystrix creates a thread pool linked to all commands grouped to HelloWorld thread pool. Then for every execution, one thread is get from pool for executing the command.

But of course we can execute a command asynchornously (which perfectly fits to asynchronous JAX-RS 2.0 or Servlet 3.0 specifications). To do it simply run:


In fact synchronous calls are implemented internally by Hystrix as return new HelloWorldCommand().queue().get(); internally.

We have seen that we can execute a command synchronously and asynchronously, but there is a third method which is reactive execution using RxJava (you can read more about RxJava in my previous post www.lordofthejars.com/2014/07/rxjava-java8-java-ee-7-arquillian-bliss.html).

To do it you simply need to call observe method:


But sometimes things can go wrong and execution of command may throw an exception. All exceptions thrown from the run() method except for HystrixBadRequestException count as failures and trigger getFallback() and circuit-breaker logic (more to come about circuit-breaker). Any business exception that you don't want to count as service failure (for example illegal arguments) must be wrapped in HystrixBadRequestException.

But what happens with service failures, what Hystrix can do for us? In summary Hystrix can offer two things:
  1. A method to do something in case of a service failure. This method may return an empty, default value or stubbed value, or for example can invoke another service that can accomplish the same logic as the failing one.
  2. Some kind of logic to open and close the circuit automatically.

Fallback:

The method that is called when an exception occurs (except for HystrixBadRequestException) is getFallback(). You can override this method and provide your own implementation.


Circuit breaker:

Circuit breaker is a software pattern to detect failures and avoid receiving the same error constantly.
But also if the service is remote you can throw an error without waiting for TCP connection timeout.

Suppose next typical example: A system need to access database like 100 times per second and it fails. Same error will be thrown 100 times per second and because connection to remote Database implies a TCP connection, each client will wait until TCP timeout expires.

So it would be much useful if system could detect that a service is failing and avoid clients do more requests until some period of time. And this is what circuit breaker does. For each execution check if the circuit is open (tripped) which means that an error has occurred and the request will be not sent to service and fallback logic will be executed. But if the circuit is closed then the request is processed and may work.

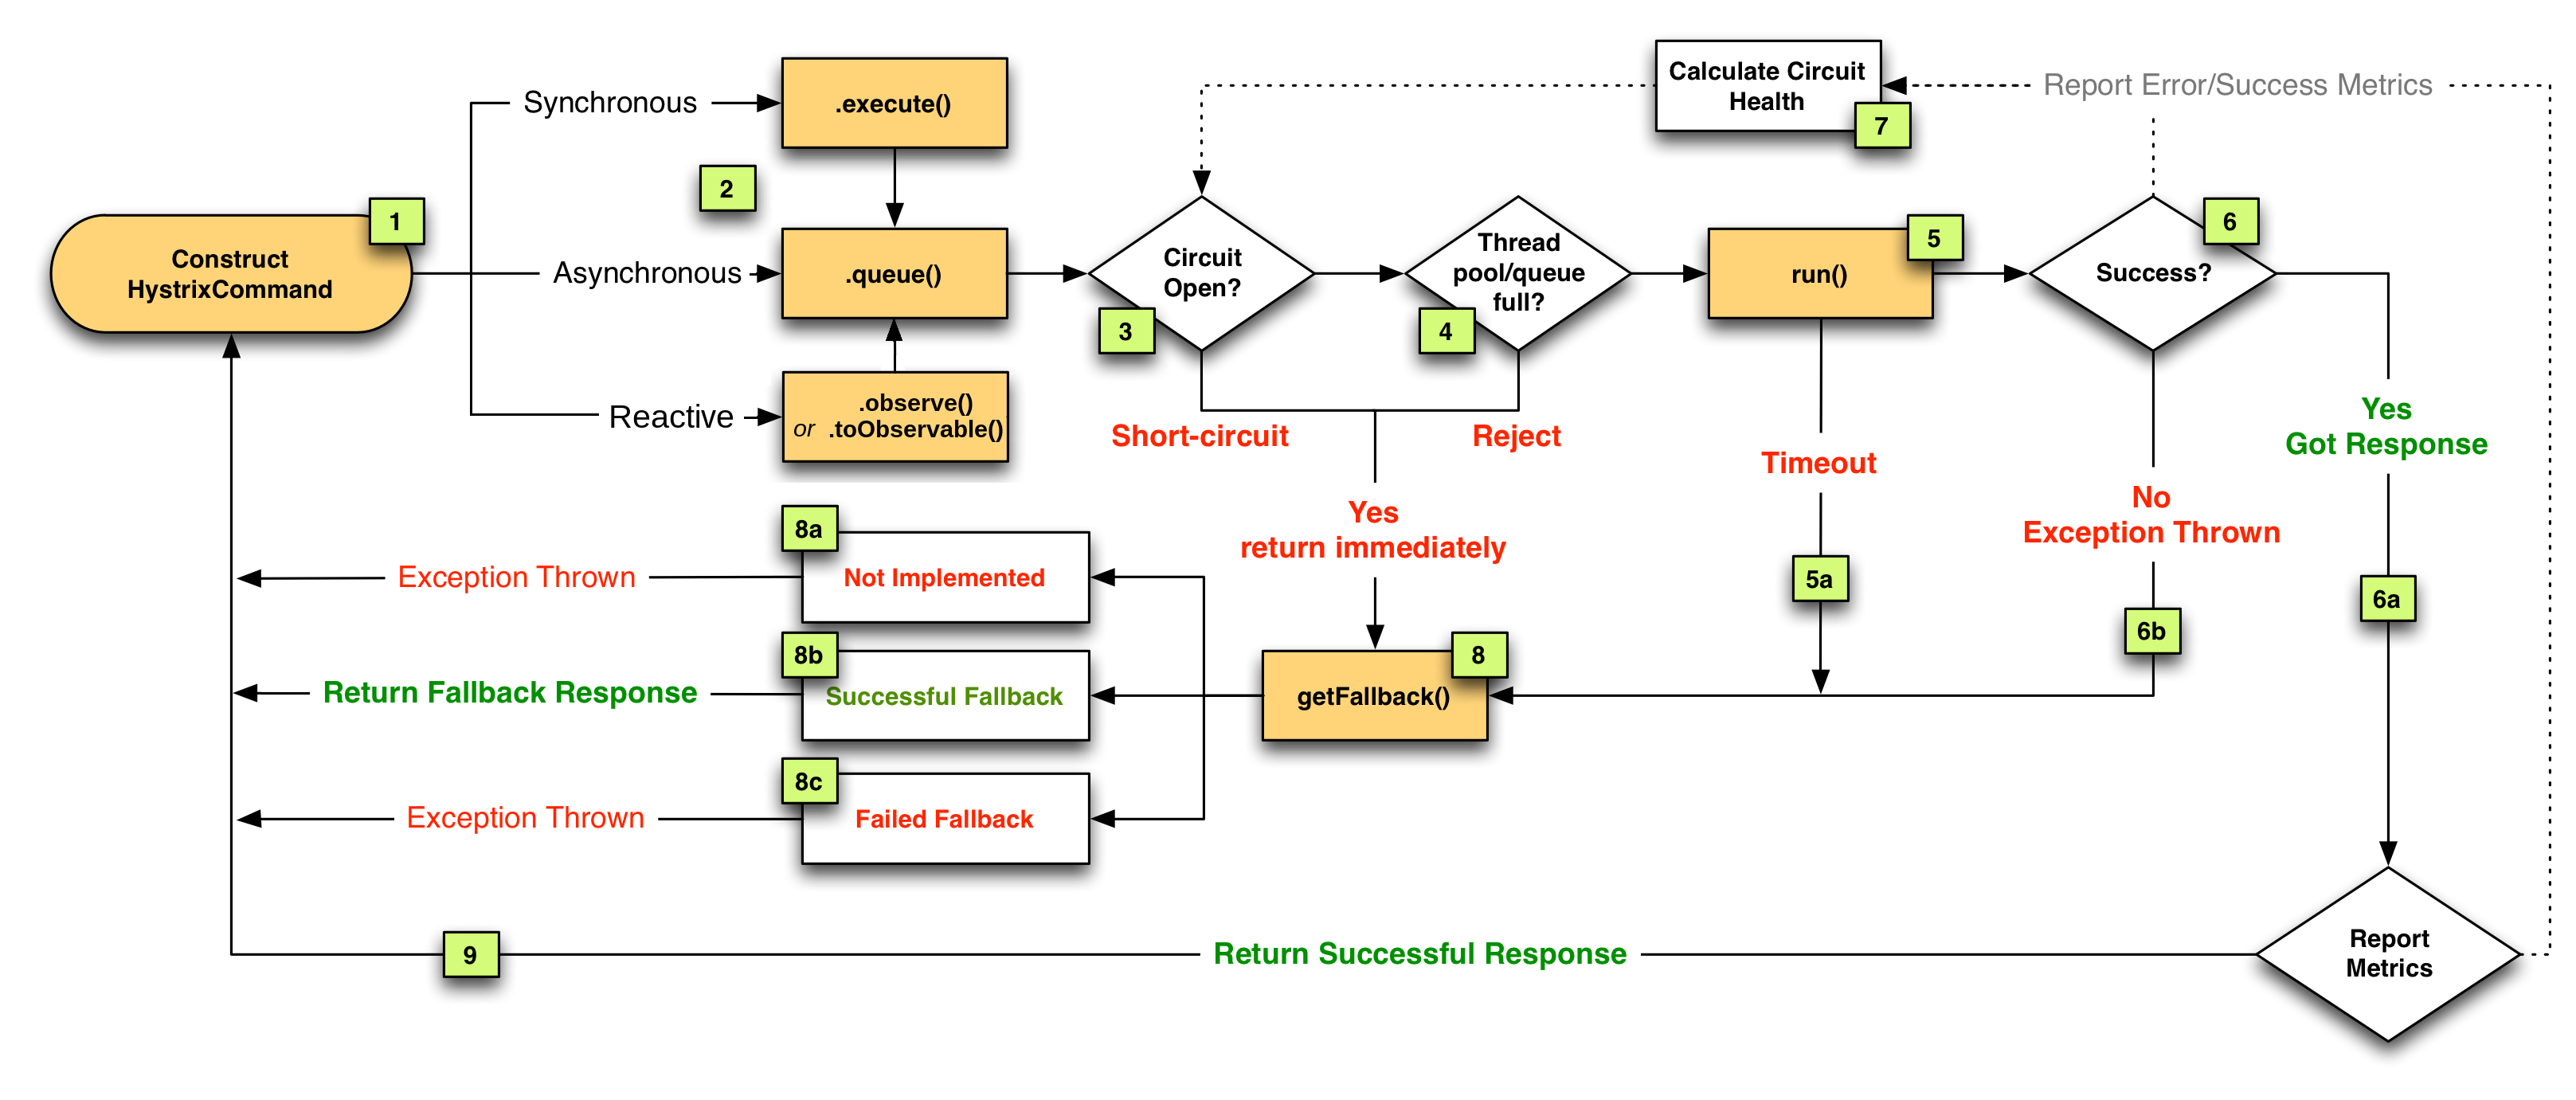
Hystrix maintains an statistical database of number of success request vs failed requests. When Hystrix detects that in a defined spare of time, a threshold of failed commands has reached, it will open the circuit so future request will be able to return the error as soon as possible without having to consume resources to a service which probably is offline. But the good news is that Hystrix is also the responsible of closing the circuit. After elapsed time Hystrix will try to run again an incoming request, if this request is successful, then it will close the circuit and if not it will maintain the circuit opened.

In next diagram from Hystrix website you can see the interaction between Hystrix and circuit.


Now that we have seen the basics of Hystrix, let's see how to write tests to check that Hystrix works as expected.

Last thing before test. In Hystrix there is an special class called HystrixRequestContext. This class contains the state and manages the lifecycle of a request. You need to initialize this class if for example you want to Hystrix manages caching results or for logging purposes. Typically this class is initialized just before starting the business logic (for example in a Servlet Filter), and finished after request is processed. 

Let's use previous HelloWorldComand to validate that fallback method is called when circuit is open.


And the test. Keep in mind that I have added a lot of asserts in the test for academic purpose.


This is a very simple example, because execute method and fallback method are pretty simple, but if you think that execute method may contain complex logic and fallback method can be as complex too (for example retrieving data from another server, generate some kind of stubbed data, ...), then writing integration or functional tests that validates all this flow it starts having sense. Keep in mind that sometimes your fallback logic may depends on previous calls from current user or other users.

Hystrix also offers other features like cashing results so any command already executed within same HystrixRequestContext may return a cache result (https://github.com/Netflix/Hystrix/wiki/How-To-Use#Caching). Another feature it offers is collapsing. It enables automated batching of requests into a single HystrixCommand instance execution. It can use batch size and time as the triggers for executing a batch. 

As you may see Hystrix is a really simple yet powerful library, that you should take under consideration if your applications call external services.

We keep learning,
Alex.
Sing us a song, you're the piano man, Sing us a song tonight , Well, we're all in the mood for a melody , And you've got us feelin' alright (Piano Man - Billy Joel)

martes, julio 08, 2014

RxJava + Java8 + Java EE 7 + Arquillian = Bliss


Microservices are an architectural style where each service is implemented as an independent system. They can use their own persistence system (although it is not mandatory), deployment, language, ...

Because a system is composed by more than one service, each service will communicate with other services, typically using a lightweight protocol like HTTP and following a Restful Web approach. You can read more about microservices here: http://martinfowler.com/articles/microservices.html

Let's see a really simple example. Suppose we have a booking shop where users can navigate through a catalog and when they find a book which they want to see more information, they click on the isbn, and then a new screen is opened with detailed information of the book and comments about it written by readers.

This system may be composed by two services:
  • One service to get book details. They could be retrieved from any legacy system like a RDBMS.
  • One service to get all comments written in a book and in this case that information could be stored in a document base database.
The problem here is that for each request that a user does we need to open two connections, one for each service. Of course we need a way do that jobs in parallel to improve the performance. And here lies one problem, how we can deal with this asynchronous requests? The first idea is to use Future class. For two services may be good but if you require four or five services the code will become more and more complex, or for example you may need to get data from one service and using it in another services or adapt the result of one service to be the input of another one. So there is a cost of management of threads and synchronization.

It will be awesome to have some way to deal with this problem in a clean and easy way. And this is exactly what RxJava does. RxJava is a Java VM implementation of Reactive Extensions: a library for composing asynchronous and event-based programs by using observable sequences.

With RxJava instead of pulling data from an structure, data is pushed to it which reacts with an event that are listened by a subscriber and acts accordantly. You can find more information in https://github.com/Netflix/RxJava.


So in this case what we are going to implement is the example described here using RxJava, Java EE 7, Java 8 and Arquillian for testing.

This post assumes you know how to write Rest services using Java EE specification.

So let's start with two services:


And finally it is time to create a third facade service which receives communication from the client, sends to both services in parallel a request and finally zip both responses. zip is the process of combining sets of items emitted together via a specified function and sent it back to client (not to be confused with compression :)).


Basically we create a new service. In this case URLs of both services we are going to connect are hardcoded. This is done for academic purpose but in production-like code you will inject it from a producer class or from properties file or any system you will use for this purpose. Then we create javax.ws.rs.client.WebTarget for consuming Restful Web Service.

After that we need to implement the bookAndComment method using RxJava API.

The main class used in RxJava is rx.Observable. This class is an observable as his name suggest and it is the responsible of firing events for pushing objects. By default events are synchronous and it is responsible of developer to make them asynchronous.

So we need one asynchronous observable instance for each service:

Basically we create an Observable that will execute the specified function when a Subscriber subscribes to it. The function is created using a lambda expression to avoid creating nested inner classes. In this case we are returning a JsonObject as a result of calling the bookinfo service. The result is passed to onNext method so subscribers can receive the result. Because we want to execute this logic asynchronously, the code is wrapped inside a Runnable block.

Also it is required to call the onCompleted method when all logic is done.

Notice that because we want to make observable asynchronous apart of creating a Runnable, we are using an Executor to run the logic in separate thread. One of the great additions in Java EE 7 is a managed way to create threads inside a container. In this case we are using ManagedExecutorService provided by container to span a task asynchronously in a different thread of the current one.

Similar to previous but instead of getting book info we are getting an array of comments.

Then we need to create an observable in charge of zipping both responses when both of them are available. And this is done by using zip method on Observable class which receives two Observables and applies a function to combine the result of both of them. In this case a lambda expression that creates a new json object appending both responses.

Let's take a look of previous service. We are using one of the new additions in Java EE which is Jax-Rs 2.0 asynchronous REST endpoints by using @Suspended annotation. Basically what we are doing is freeing server resources and generating the response when it is available using the resume method.

And finally a test. We are using Wildfly 8.1 as Java EE 7 server and Arquillian. Because each service may be deployed in different server, we are going to deploy each service in different war but inside same server.

So in this case we are going to deploy three war files which is totally easy to do it in Arquillian.

In this case client will request all information from a book. In server part zip  method will wait until book and comments are retrieved in parallel and then will combine both responses to a single object and sent back to client.

This is a very simple example of RxJava. In fact in this case we have only seen how to use zip method, but there are many more methods provided by RxJava that are so useful as well like take(), map(), merge(), ... (https://github.com/Netflix/RxJava/wiki/Alphabetical-List-of-Observable-Operators)

Moreover in this example we have seen only an example of connecting to two services and retrieving information in parallel, and you may wonder why not to use Future class. It is totally fine to use Future and Callbacks in this example but probably in your real life your logic won't be as easy as zipping two services. Maybe you will have more services, maybe you will need to get information from one service and then for each result open a new connection. As you can see you may start with two Future instances but finishing with a bunch of Future.get() methods, timeouts, ... So it is in these situations where RxJava really simplify the development of the application.

Furthermore we have seen how to use some of the new additions of Java EE 7 like how to develop an asynchronous Restful service with Jax-Rs.

In this post we have learnt how to deal with the interconnection between services andhow to make them scalable and less resource consume. But we have not talked about what's happening when one of these services fails. What's happening with the callers? Do we have a way to manage it? Is there a way to not spent resources when one of the service is not available? We will touch this in next post talking about fault tolerance.

We keep learning,
Alex.
Bon dia, bon dia! Bon dia al dematí! Fem fora la mandra I saltem corrents del llit. (Bon Dia! - Dàmaris Gelabert)
Music: https://www.youtube.com/watch?v=BF7w-xJUlwM

lunes, junio 09, 2014

Injecting properties file values in CDI using DeltaSpike and Apache TomEE


One of the great improvement in Java EE 5 and beyond it is the introduction of CDI (Context and Dependency Injection). CDI is used for injecting dependencies among a lot of other things like events, interceptors, … and can be used in POJOs.

In some cases instead of injecting other objects (as a dependency injection), you want to inject a value from a properties file into a class that needs to be configured externally.

I have written an example in Tomitribe community zone: https://github.com/tomitribe/community/tree/master/injecting-properties 

We keep learning,
Alex.


Sora ni akogarete  sora wo kakete yuku, Ano ko no inochi wa hikoukigumo (The Wind Rises - Joe Hisaishi, Yumi Arai)

lunes, mayo 19, 2014

Java Cookbook Review


This new edition of Java cookbook is an amazing update of the book which covers a lot of the new features implemented in Java 8. 

The author writes in a clear and concise way how to solve some of the most of basic problems you will encounter in your day to day work in Java.

The book shows you from how to concatenate two strings to use functional interfaces.

Definitely if you have already had some experience (1-2 years) in Java and wants to improve your skills inside Java world, this book is for you. 

But it is even more, if you are a Java6 developer and want to update to Java7 or 8 this book is also for you. The author has taken the time to explain not only how to solve a problem using previous concepts of Java but also using the new ones.
In my opinion the book has only one contra, and it is that although new chapters about new Java API like javax.time has been added, the book spends so much pages on explaining some "outdated" technology like Swing or AWT.

Really pleasant book to read, very concise about what is the problem to be resolved, and although you consider yourself as a Java "expert", you will learn something for sure.

Testing Polyglot Persistence Done Right [slides]


This week I was at Krakow in the amazing conference called GeeCon. My talk was "Testing Polyglot Persistence Done Right" and it was cospoken with my friend Bartosz Majsak.

The abstract was:

"Data storage is one of the most crucial parts of any applications, and we use many different tools and tricks to keep it in a good shape. We frequently use both old school relational systems with new approaches commonly known as NoSQL. We write sophisticated queries and use optimization techniques to give our end users the greatest possible experience.
So why is persistence very often skipped in the testing efforts? Is it really that complex and painful to setup? During this talk we will have a closer look at Arquillian Persistence Extension together with NoSQLUnit. These tools remove that burden and boilerplate to make you a happy and productive programmer again! Join this session and see for yourself that writing tests for your data storage logic is as easy as writing normal unit tests!"

And here you can see the slides (http://www.slideshare.net/asotobu/testing-polyglot-persistence-done-right). If you have any question don't hesitate to approach us.


We keep learning,
Alex.
En los mapas me pierdo. Por sus hojas navego. Ahora sopla el viento, cuando el mar quedó lejos hace tiempo. (Pájaros de Barro - Manolo García)

Music: https://www.youtube.com/watch?v=9zdEXRKJSNY


lunes, abril 21, 2014

JPA Tip: Inject EntityManager instead of using PersistenceContext


Almost all projects you develop with Java EE will contain a persistence layer and probably you will use JPA for dealing with SQL systems. One way to get an EntityManager is using @PersistenceContext. In this post we are going to explore the advantages of injecting EntityManager instead of using PersistenceContext annotation.

I have written the example and the explanation on github using Docstract.  You can read on https://github.com/tomitribe/community/tree/master/injecting-entitymanager.

We keep reading,
Alex
Pistol shots ring out in the bar-room night, Enter Patty Valentine from the upper hall, She sees a bartender in a pool of blood, Cries out, "My God, they killed them all" (Hurricane - Bob Dylan)

Music: https://www.youtube.com/watch?v=hr8Wn1Mwwwk

lunes, abril 14, 2014

Docstract-0.2.0 Released.


Docstract is an small java project which reads a java source file, extracts the comments between /** and */ sequentially from all over the file and stores them inside an output AsciiDoc file. The idea is not new in fact it is from https://github.com/javaee-samples/javaee7-samples/ developed by Aslak Knutsen but instead of using Ruby and inside Awestruct, this project is written in java and it is run from CLI.

Let me show you an example to understand what this application does:

This is a class which contains some comments to be processed.

And the output document looks like:

Note that in comments we are also using include macro for inserting files inside. The rules for inclusion are the next ones:

  • if include contains a java file, like first example, the whole class is read and inserted within AsciiDoc source code blocks.
  • if include contains a java file but with # symbol, like second one, the right part of # will be used as method name of given class. So for example Project#setId(String, String) will include a method of Project's class called setId and receiving two string parameters.
  • if include contains an xml file, the file is inserted "as is" within AsciiDoc source code block.
  • if include contains an xml file and between brackets there is an xpath expression, the result of that expression will be inserted.
  • any other include is left "as is", so it will be processed by AsciiDoc(tor) processor.

Also note that the include files will be resolved relative from place where the CLI is being run, typically from the root of the project.

You can use callouts inside java and xml code and the processor will render it in the proper way.

In java you can write a callout as a single line comment with callout number between <, > at start.

In xml you can write callouts between +xml+ comments and the callout number being the first word.

You can grab a runnable jar from https://bintray.com/lordofthejars/generic/Docstract/0.2.0/view/files

To render previous class we can call as:

java -jar docstract-<version>.jar --input=src/test/java/com/lordofthejars/asciidoctorfy/MM.java --output=README.adoc


And an AsciiDoc file will be generated from comments blocks.

There is one optional parameter called --baseDir. This parameter is used to set the baseDir in include macros. So for example if you set baseDir to /home/lotj/project, the include macro will be resolved to include::/home/lotj/project/src/test/java/....


New features will be added when they are required but of course feel free to clone and improve it.


We Keep Learning,
Alex.
Weiß mit dem Locken umzugehn, Und mich auf's Pfeifen zu verstehn. Drum kann ich froh und lustig sein, Denn alle Vögel sind ja mein. (Die Zauberflöte - Wolfgang Amadeus Mozart)
Music: https://www.youtube.com/watch?v=PRtvVQ1fq8s

miércoles, marzo 26, 2014

Apache TomEE + NoSQL (writing your own resources)


@Resource annotation appeared for the first time in Java EE 5 specification.  When you annotate an attribute with @Resource, it will be the container responsible of injecting the requested resource. The typical example is used with DataSource class.

That's great and you can use it with JMS as well, but what's happening to NoSQL databases, would not it be perfect to do something similar for them?

With Apache TomEE you can do it by providing your own @Resource provider class. In this post we are going to see how you write your own provider for MongoDB so you can use @Resource for MongoDB too.

The first thing to do is create the provider class, which is a simple POJO:

It is a simple POJO with a method which returns a MongoClient class (the base class for Java MongoDB driver), and setters with required parameters.

Next step is creating a file called resources.xml in WEB-INF directory. In this file we configure TomEE so he knows about the provider/class.

Notice that in this file you set the provider class and how the attributes are set. In fact you set them more or less like a properties file. So when you are are writing address 127.0.0.1, TomEE under the cover will call provider.setAddress("127.0.0.1")

The last thing to do is start using @Resource annotation with MongoDB.

So in this case we are creating a MongoClient provider because TomEE requires a no parameters constructor, but MongoClient has parameters so we need to create a provider class with a method which returns the MongoClient instance to be used.

And what really is awesome about TomEE is that you can even override your @Resource definitions from system properties, so you can do something like:

-Dmongo.address=localhost

where mongo is the id of the resources file and address the name of the field.

So you can change each of the value in an easy way depending on the environment you are pushing. And that's an awesome thing.

So now there is no excuses to not start treating NoSQL databases like SQL databases from the point of view of Java EE.

[Update] Romain notice me that with latest version of Apache TomEE you don't need a default constructor, parameters are bound directly properties as constructor params

We keep learning,

Alex.

Et j’ai sa main!, Jour prospère!, Me voici, Militaire et mari! (Ah mes amis - Gaetano Donizetti)

Music: https://www.youtube.com/watch?v=3aS6M8j3pvQ

martes, febrero 18, 2014

Learn CDI with Apache TomEE [Video tutorials]


In this post I have grouped a collection of videos I recorded some time ago to learn the basic concepts of CDI (Context and Dependency Injection) using Apache TomEE. I suggest clicking the YouTube icon to watch them directly from YouTube site and configure them in HD.

Servlets


CDI (Inject)


CDI (Scopes)


CDI (Name Qualifiers)


CDI (Qualifiers)


CDI (Alternatives)


CDI (Postconstruct)


CDI (Producer)


CDI (Events)


CDI (Interceptors)


CDI (Decorators)


We Keep Learning,
Alex.

Que vas a hacer sin mí, Cuando tú te enteres que you estoy pegao, Con el que sabe no se juega, Y si se juega con cuidado (El Cuchi Cuchi - Mayimbe)

lunes, febrero 17, 2014

Aliens have invaded Undertow

What is Undertow?

Undertow is a flexible performant web server written in java, providing both blocking and non-blocking API’s based on NIO.

Undertow has a composition based architecture that allows you to build a web server by combining small single purpose handlers. The gives you the flexibility to choose between a full Java EE servlet 3.1 container, or a low level non-blocking handler, to anything in between.

Undertow is sponsored by JBoss and is the default web server in the Wildfly Application Server.

Writing tests for Undertow

Arquillian-Container-Undertow as every Arquillian Container Extension  it take cares of you of starting, stopping and deploying the application. Also provides an Shrinkwrap resolver for creating the Undertow deployment file.

To simplify the development of tests on Undertow we have created two Shrinkwrap resolvers:
  • Embedded Servlet Deployment
  • Non-blocking handler

Maven Artifacts


Embedded Servlet Deployment


When you want to deploy a servlet/s inside Undertow, you must create a DeploymentInfo class and provide all the required information. 

For this reason Arquillian-Container-Undertow provides a Shrinkwrap resolver named UndertowWebArchive.


And then we can write our test:

Non-blocking handler


But with Undertow you can also write non-blocking handlers. For creating a non-blocking handler in Undertow you simply must create a class that implements HttpHandler interface and register it. For this reason Arquillian-Container-Undertow provides a Shrinkwrap resolver named UndertowHttpHandlerArchive.


And then we can write our test:

Configuration


You can configure the bind address and port of Undertow. By default Undertow is opened at localhost:8080.

But you can also set the bind address and the listening port.

<1> If port is set to -1, a random port between 1024 and 49151 is used.

So now you can write tests for Undertow container within the context of Arquillian.

We keep learning,
Alex.

Oh django! After the showers is the sun. Will be shining... (Django - Luis Bacalov & Rocky Roberts)

Music: https://www.youtube.com/watch?v=UX3h22aABIc

lunes, enero 27, 2014

DRY with examples on documentation. Include Java Extension for Asciidoctor.


One of the great features that Asciidoctor offers us as a writers of manuals, tutorials and documentation in general is that allows us to follow the DRY pattern. If for example you are writing a tutorial, probably you will have one part of the tutorial which will be the documentation, and another part which will be source code with examples. Asciidoctor allows us to write the documentation and include the examples directly from source code project to document.

For example:


As you can see you can include directly from source code the example and Asciidoctor will render it inside the document. Moreover if you set the language, Asciidoctor will highlight the code too.

But as you can see there is one problem with this approach, you are including the whole file, with imports, javadoc, comments, ... and maybe you only want to show a method of that class. Now with Asciidoctor you have two options:

Using lines attribute:

Which have the problem that modifying original source code also modifies the code embedded inside tutorial.

Using tags:

Which is an invasive method that requires you modify the original source code:


But now we have got another option in case your language is Java. And it is using java-semantic-asciidoctorj extension. This extension allows us to embed parts of the code by its components. That is you can set which method to add, which class, if you want to add imports or not, ... The extension only works with asciidoctorj-1.5.0.preview1 and beyond, and uses the new SPI for extensions, so you only have to add the jar extension on classpath, and the extension is automatically registered.

An example of usage of this extension could be the next one. Let's imagine that we have a class with 5 methods and we want to include only a method called mymethod which receives an String as parameter and it has no return value. Also we want to add the imports, but nothing else.

We could do something like:

Note that now we are not invading our code with comment-tags, nor fixing the position with lines of the method inside our document.

The attributes you can set in include are:
  • imports: adds the imports.
  • fields: adds the fields of the main class.
  • class: adds all the content of the main class.
  • enum=<classname>: adds the enum with the given name. The enum should be defined inside the class we are adding.
  • annotation=<classname>: same as enum but for annotations.
  • class=<classname>: same as enum but for inner classes.
  • contructor=<constructorName>(<parameterType1>,<parameterType2>, ....): adds the defined constructor. In this case we must set the constructor name and the type of each parameter. For example: MyClass(String).
  • method=<returnType> <methodName>(<parameterType1>, <parameterType2>, ...): same as constructor but for methods, which implies adding the return type. Note that it is not required to add any modifier nor throws classes.

Now we can use our classes within our documentation and by adding the required block.

This version of plugin works with Java 1.7 and before, not with Java 1.8 but it could work in some cases.

The extension is published on bintray, so to install you simply have to add bintray repository and the required dependency:

The project is hosted at: https://github.com/lordofthejars/asciidoctorj-extensions

We keep learning,
Alex.
I feel shouting ya-hoo, And me still feeling hungry, Cowabunga!!, Cookie monster went and ate the new red two. Monster Went and Ate My Red 2 - Elvis Costello & Elmo
Music: https://www.youtube.com/watch?v=KxardpBReQc